As a product manager you need to provide product documentation to your users and customers. There are many ways to do this, and choosing one can be hard. But user documentation forms part of the product experience and should be given due consideration.
I recently needed to publish some documentation for a very early-stage product. Given where we were it didn’t make sense investing in more sophisticated (and expensive) publishing and distribution tools such as ClickHelp. But while the easiest thing to do is to open up Word and start typing, it soon becomes a struggle when you need to make and distribute updates and you risk having some people still referring to old versions. You’re never going to get it right the first time around, and the harder it is to distribute to your customer base, the less likely you’ll be to clean-up and update it.
The approach I describe here was for us the best balance between ease-of-use, setup-time, cost and quality. If you want to see an example of the end result, take a look at the data specifications for the Defacto Health Insurances Accepted dataset here, which we were able to get stood up in a minimal amount of time. The site for Material for MkDocs, the tool that we used, gives you a sense for all that is possible.
What we like about this approach:
- Clean, modern interface and formatting
- Multiple navigation options (our simple site uses just a single left navigation pane, but the Material for MkDocs site shows left, right and top navigation)
- Company branding on the top
- Fast, powerful search capability
- Easy to set up a publishing and versioning system (though I don’t go into that in this post)
- Easy to set up and get started
- Content formatting capability including embedded images, accordion-style panels, icons, etc.
How it works
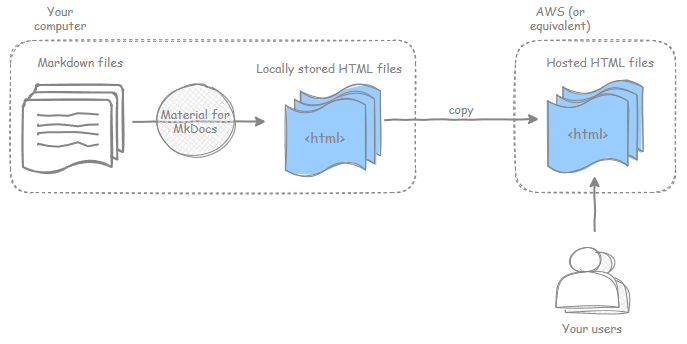
The final result is a set of static HTML pages served from a publicly accessible location (we’ve used AWS S3 but other alternatives work just as well). You write the content using Markdown format, and Material for MkDocs styles and converts it into static HTML pages, which you can then upload to your choice of hosting solution.
This post is intentionally prescriptive on the use of Markdown and Material for MkDocs; when I started out I found a head-spinning number options for the first step (writing “raw” content) as well as the second step (styling and converting “raw” content to HTML), but no end-to-end recipe to just get your documentation done; which is what led to this post.
How to go about it
We’ll create and deploy some very lightweight sample documentation in this post. The instructions assume you’re using a Windows computer, have sufficient access rights to install software, and know how to open up a Windows command prompt to key in commands. Following this post shouldn’t take you more than 30 minutes to get everything set up and running with some placeholder documentation pages.
At a high level, we’ll need to:
- Install the Material for MkDocs tool
- Create documentation content in Markdown format
- Convert Markdown to HTML pages
- Set up S3 to host the HTML pages
Install Material for MkDocs
We’ll install Material for MkDocs into a folder called doctool directly within C:\. Material for MkDocs runs on Python. Skip ahead if you already have Python installed, otherwise follow the instructions below to install Python.
Download and install Python
You can check if Python is installed by opening a Command Prompt and running python --version. If Python is installed you’ll see “Python” followed by a version number.
If you don’t have it installed, download the latest version of Python 3 ( Python 3.10.0 at the time of this writing) for Windows from this page. From the download page for that version, download the Windows installer (64-bit) installable and run it. You can just accept the default installation options.
Create a virtual environment for Material for MkDocs
While not essential, it’s best practice to create a “virtual environment” to install Material for MkDocs, to keep any settings isolated from other Python projects you are working on.
Create a new directory called doctool within C:\, and enter the following commands at the command line within that directory to first create and then start (or “activate”) a Python virtual environment.
python -m venv env
env\Scripts\activate
Once you activate the environment you’ll see that your prompt has changed and is preceded by (env).
Install Material for MkDocs
Enter the following command within your virtual environment to install Material for MkDocs:
pip install mkdocs-material
Create documentation content in Markdown format
Create a new documentation project
We’ll create a project for our sample documentation, called sampledocs. Run the following command at the command prompt within the doctool folder: mkdocs new sampledoc
This will create files and folders within doctool as follows:
C:
|-doctool/
|-env/
|-sampledoc/
|-docs/
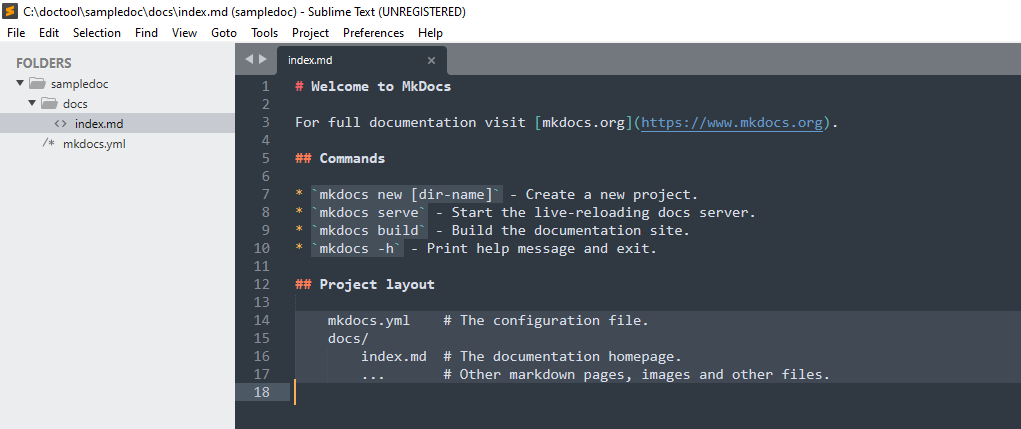
| |-index.md
|-mkdocs.yamlmkdocs.yaml is where you’ll specify settings for your documentation such as styling options, your copyright notice, etc. The minimal settings you’ll need to specify in mkdocs.yaml is to define the theme to use as material. Add the following to mkdocs.yaml (with the second line indented as shown)
theme:
  name: material
index.md is the first page of your documentation and some placeholder content is created for you when you create the project; you’ll create additional files within sampledoc/docs/ corresponding to pages of your documentation.
(For any future documentation projects you’ll just replace sampledoc with a name of your choosing, but otherwise the structure will be similar.)
Preview documentation
You can preview your documentation by entering into the sampledoc folder and running mkdocs serve at the command line. You should see some INFO messages as follows:
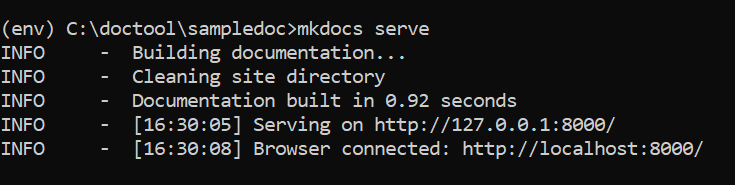
If you point your browser to http://localhost:8000/ you should see the page below:

You’ll notice that it corresponds to the content within the index.md file within sampledoc\docs
Create documentation pages
Flesh out your documentation based on your needs. Each page of your documentation will correspond to a file with a .md extension, and you can create links between multiple pages. If you’re unfamiliar with Markdown, I highly recommend The Markdown Guide as a great way to get acquainted. I prefer to use a text editor like Sublime Text to write content, but there are also Markdown authoring tools such as Markdown Monster and ghostwriter.
Material for MkDocs gives you myriad customization options including changing colors, logos, headers and footers, etc, all of which is documented here. As you add content and tweak settings you can preview changes in real-time within your browser.
Convert Markdown to HTML pages
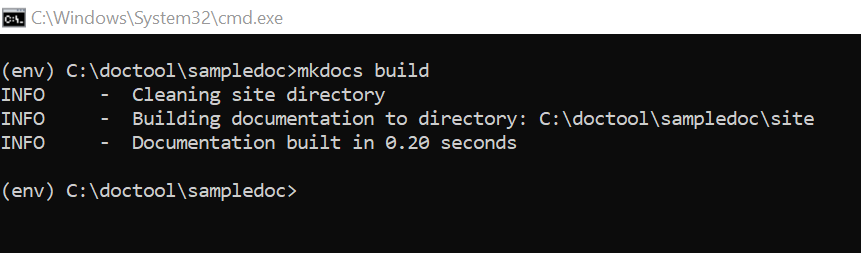
Once your documentation is at a stage where you’re ready to publish it, you’ll generate html pages by running mkdocs build at the command line.
This will generate a new folder called site, and populate it with the HTML pages corresponding to your Markdown pages.
Set up AWS S3 to host the HTML pages
We used AWS S3 because we use AWS to host our other work, but there are lots of options out there. If you want to use a custom domain there’s a bit more configuration involved, but if you’re ok with an AWS URL it’s really straightforward. The steps to host a static HTML site on AWS S3 are well-documented in this blog post.
Closing thoughts
Your documentation says a lot about your product and is a key customer touchpoint. Documentation that’s well-written, well-structured, easy to access, searchable and regularly updated goes a long way to improving your customers’ experience. Hopefully this post gave you some tools to get you there!